Preparing and maintaining your vehicles battery

Posted on

In order to have a proper working vehicle, your battery needs to be in good working order as well. Having clean connections and a fully charged battery is a benefit for you as well as your vehicle. Without the battery, power cannot be supplied to the areas of your vehicle that need it in order to run properly. If the battery is dead, your vehicle will not even start. There are some signs to be on the lookout for to tell when your battery is starting to wear out. If you vehicle is getting harder and slower to start, it may be a sign that you will need a new battery soon. Testing a battery is a simple procedure that can be done during your regularly scheduled maintenance inspection.

Young-Drivers-Car-BatteryREGULAR INSPECTION & MAINTENANCE OF YOUR BATTERY

Regular testing and inspection will help to maximise battery life. A routine inspection at least once a month is recommended to maintain optimum performance.
Use the following as a guide when examining your battery:
  • Ensure the battery top is clean and dry, free of dirt and grime. A dirty battery can discharge across the grime on top of the battery casing.
  •  Inspect the terminals, screws, clamps and cables for breakage, damage or loose connections. These should be clean, tight and free of corrosion.
  •  Apply a thin coating of high temperature grease to posts and cable connections for added protection.
  •  Inspect the battery case for obvious signs of physical damage or warpage. This usually indicates the battery has overheated or has been overcharged.
  • Check electrolyte levels to ensure that fluid levels are over the top of battery plates. If necessary top up using distilled or demineralised water. Never top up fluid levels with acid.
  • Test the battery using either a hydrometer or voltmeter and charge if necessary.
If you are unsure about the condition or state of charge of the battery, take it to your local battery reseller. They can inspect and test your battery and provide you with professional advice and assistance.


BATTERY TESTING

Battery testing should form part of a regular maintenance routine. Pre-emptive battery replacement can help eliminate many of the costs and problems associated with a flat battery.

Voltage and Specific Gravity

Voltage (V) and Specific Gravity (SG) are measurements used to determine a battery’s state of charge. Voltage is a quick and easy way of measuring charge levels and is measured by connecting either a multi-meter or voltmeter and obtaining a DC reading. Always connect the multi-meter parallel to the circuit being tested, observing polarity; otherwise the result will be negative.
Hydrometers measure the Specific Gravity of the electrolyte and indicate the density of electrolyte compared to water. As this requires access to acid reservoirs, it is only suitable for use with maintainable batteries.

Testing Methods

Unloaded Testing
This is performed using either device, when there is no current draw on the battery. A specific gravity reading of 1.275 to 1.290 shows a full charge whereas a reading below 1.240 indicates that the battery should be recharged. If the stabilised open circuit voltage is below 12.55V, this also indicates recharging is required.
Low Load Testing
This is conducted using a multi-meter or volt meter whilst running an accessory, such as the headlights, and taking a voltage reading. The battery in a 12V system should have at least 11.5V DC with the lights on. If the voltage drops below this level, the battery needs charging.


670px-Charge-a-Dead-Car-Battery-Step-9BATTERY CHARGING

Always read the manufacturer’s instructions before attempting to charge a battery and ensure you have a good quality Australian-approved battery charger. The battery type and its internal components will determine which type of charger is required.
Important Note:
Avoid quick charging as this only charges the surface of the battery plates and can increase the chance of overheating, leading to permanent battery damage.
Be aware of all safety precautions that should be observed during the charging operation before attempting to charge a battery.
  •  Turn the charger off before attaching, rocking or removing the terminal clamps.
  •  Keep open flames and sparks away from the battery.
  •  Keep vent caps in place.
  •  Charge in well ventilated area.
  •  Follow the battery charger manufacturer’s instructions to avoid overheating.

Specific charging rates or times are difficult to detail due to a number of other features, such as:

1. The electrical capacity of the battery.
2. Temperature of the electrolyte.
3. Battery state of charge at the start of the charging period.
4. Battery age and condition.

FACTORS EFFECTING BATTERY LIFE

As batteries age they gradually lose their capacity as their function is performed. The constant charge and discharge eventually leads to failure. Components corrode over time, electrical shorts occur and vibration causes damage; all eventually causing failure. Overcharging and undercharging of a battery will also have a bearing on battery life.

Battery Inspection

Check electrolyte level – fluid below the tops of the separators indicates overcharging or poor maintenance. Overcharge condition may be due to incorrect voltage setting, low voltage caused by heat or internal defects, or old age deterioration.
  • Is there electrolyte on the top of the battery? This can indicate overcharging or overfilling.
  • Is the battery loose in the carrier? This can cause failure from vibration.
  • Does the battery have signs of damage or mistreatment? This can also cause failure.

Discharged (flat) Batteries

A flat battery should be checked with a hydrometer. A low Specific Gravity reading of 1.220 or less in all cells indicates a discharged battery and it must be charged before further examination and testing can occur. The discharged condition may be due to a problem in the electrical system (slipping alternator belt, faulty regulator or alternator, high resistance due to corrosion). Internal shorts may also be due to manufacturing defects or shorts through the ageing process or vibration damage.

Early Warning Signs

Batteries often fail when least expected. The usual warning is a slower than normal battery ability to crank the engine. Other less noticeable factors, such as changed driving patterns and colder/hotter weather will all have an effect on the life of a battery. We encourage you to ask for a ‘FREE Battery Test’. If the battery is near failure, it may avoid the inconvenience of a roadside breakdown.

TECHNICAL TIPS

  • Vibration can reduce a battery’s life. Always use an approved battery clamp to limit vibration.
  • Many alleged ‘dead batteries’ are merely flat batteries. Drivers simply leave lights on or can have faulty voltage regulators.
  • Ensure your battery is properly tested before replacing a battery.
  • It’s impossible to know exactly when a battery might fail. A slow starting engine is sometimes an indication.
  • Old batteries can give trouble in colder weather.
  • Equally, if an engine area becomes overheated in very hot weather and the battery is under strain from air conditioners it may fail. Regular battery checks are always advised.

WHY DO BATTERIES FAIL?

Batteries have a finite life, determined by the application and the operating conditions. Battery failure can be attributed to various factors, however the causes of failure fall under two distinct categories: manufacturing and non-manufacturing faults.

Manufacturing Faults

Typically occur within the first 3 months.

Short Circuits/Dead Cells

Where one cell will show a dramatically lower Specific Gravity (SG) reading than the other cells.

Internal Break

Usually resulting from physical damage to a battery during transportation.
Century’s stringent quality assurance and inspection processes demanded by leading vehicle manufacturers ensure genuine manufacturing faults in Century Batteries are negligible.

Non Manufacturing Faults

These fall outside of Century’s strict quality control systems and are more likely to occur the longer the battery is in service. They are often attributed to a problem with the vehicle’s electrical system, its operation or the battery application.

Wear and Tear

As a battery ages, grid metal corrodes and active material is lost from the plate. Over time this leads to a point where the battery will no longer be able to start a vehicle. High temperature will accelerate the degradation rates.

Physical Damage

Incorrect fitment, handling and storage often leads to external damage and subsequent battery failure.

Incorrect Application

Fitting a smaller, less powerful battery or a battery designed for another application can lead to early failure.

Negligence

Failure to maintain fluid levels exposes internal components and accelerates battery failure.

Sulphation

Occurs when the battery is allowed to stand in a discharged state for an extended period of time.

Over-Charging

Often caused if the alternator is incorrectly set or the alternator voltage control fails.

Under-Charging

Short journeys, stop start driving or faulty alternators will not fully recharge a battery.

Discharge

Lights or other accessories left on for extended periods.


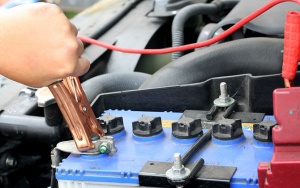
It is a great idea to store a set of Jumper Leads in your vehicle in-case you or a friend requires an emergency Jump Start.

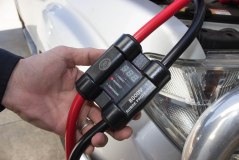
KT Intelligent Jumper Leads contain a 12 & 24V Voltage Display and have changed the way people think about Jumper Leads and how they are used.

The 12V & 24V LCD Voltage Display will immediately provide the exact voltage reading of the battery when connected. The Voltage reading will flash to indicate the battery condition.

For standard vehicles, 4×4’s, boats or anything running 12 Volt Systems, below 11.8V is considered a flat battery and requires charging while 14.2V is considered overcharged. The voltage reading will flash to indicate a flat or overcharged battery. When the Voltage reading does not flash this indicates a healthy battery life.

For Trucks or anything running 24 Volt Systems, anything below 23.6V is considered flat (requires charging) and anything above 28.4V is considered overcharged.

The 80°C Temperature Sensor (Amber Warning) will only ever appear when the Intelligent Jumper Leads have reached 80°C. In this case, it is recommended to dis-continue the jump start process to eliminate the possibility of damage to yourself or your vehicle. Ensure the Temperature warning light has turned off before continuing the jump start process.

A Green L.E.D Light indicates a correct connection and a Red Light indicates an incorrect connection.
(See below photos of L.E.D Light Indicators for correct and incorrect connections).

A Green Light Indicates a 'Correct Connection'. How the KT Intelligent Jumper Leads should be connected to the Battery. A Red Light Indicates an 'Incorrect Connection'. How the KT Intelligent Jumper Leads SHOULD NOT be connected to the Battery.

The KT Intelligent Jumper Leads feature a voltage protection that exceeds 8,000 Volts. This exceeds any other jumper lead product in the market. It will save you time and money for possibly replacing your battery where it may not  necessarily be faulty. The range is available in 450Amp 3M, & 750Amp, 3M. The Intelligent Jumper Leads are available in a hard carry case for easy storage and transportation.

Read More about the Intelligent Jumper Leads