
DRIVE FURTHER . . . PLAY LONGER . . .STAY CHARGED!

 KT SOLAR is excited to introduce its new and innovative 48V Solar Charging System for Golf Carts and Electric vehicles.
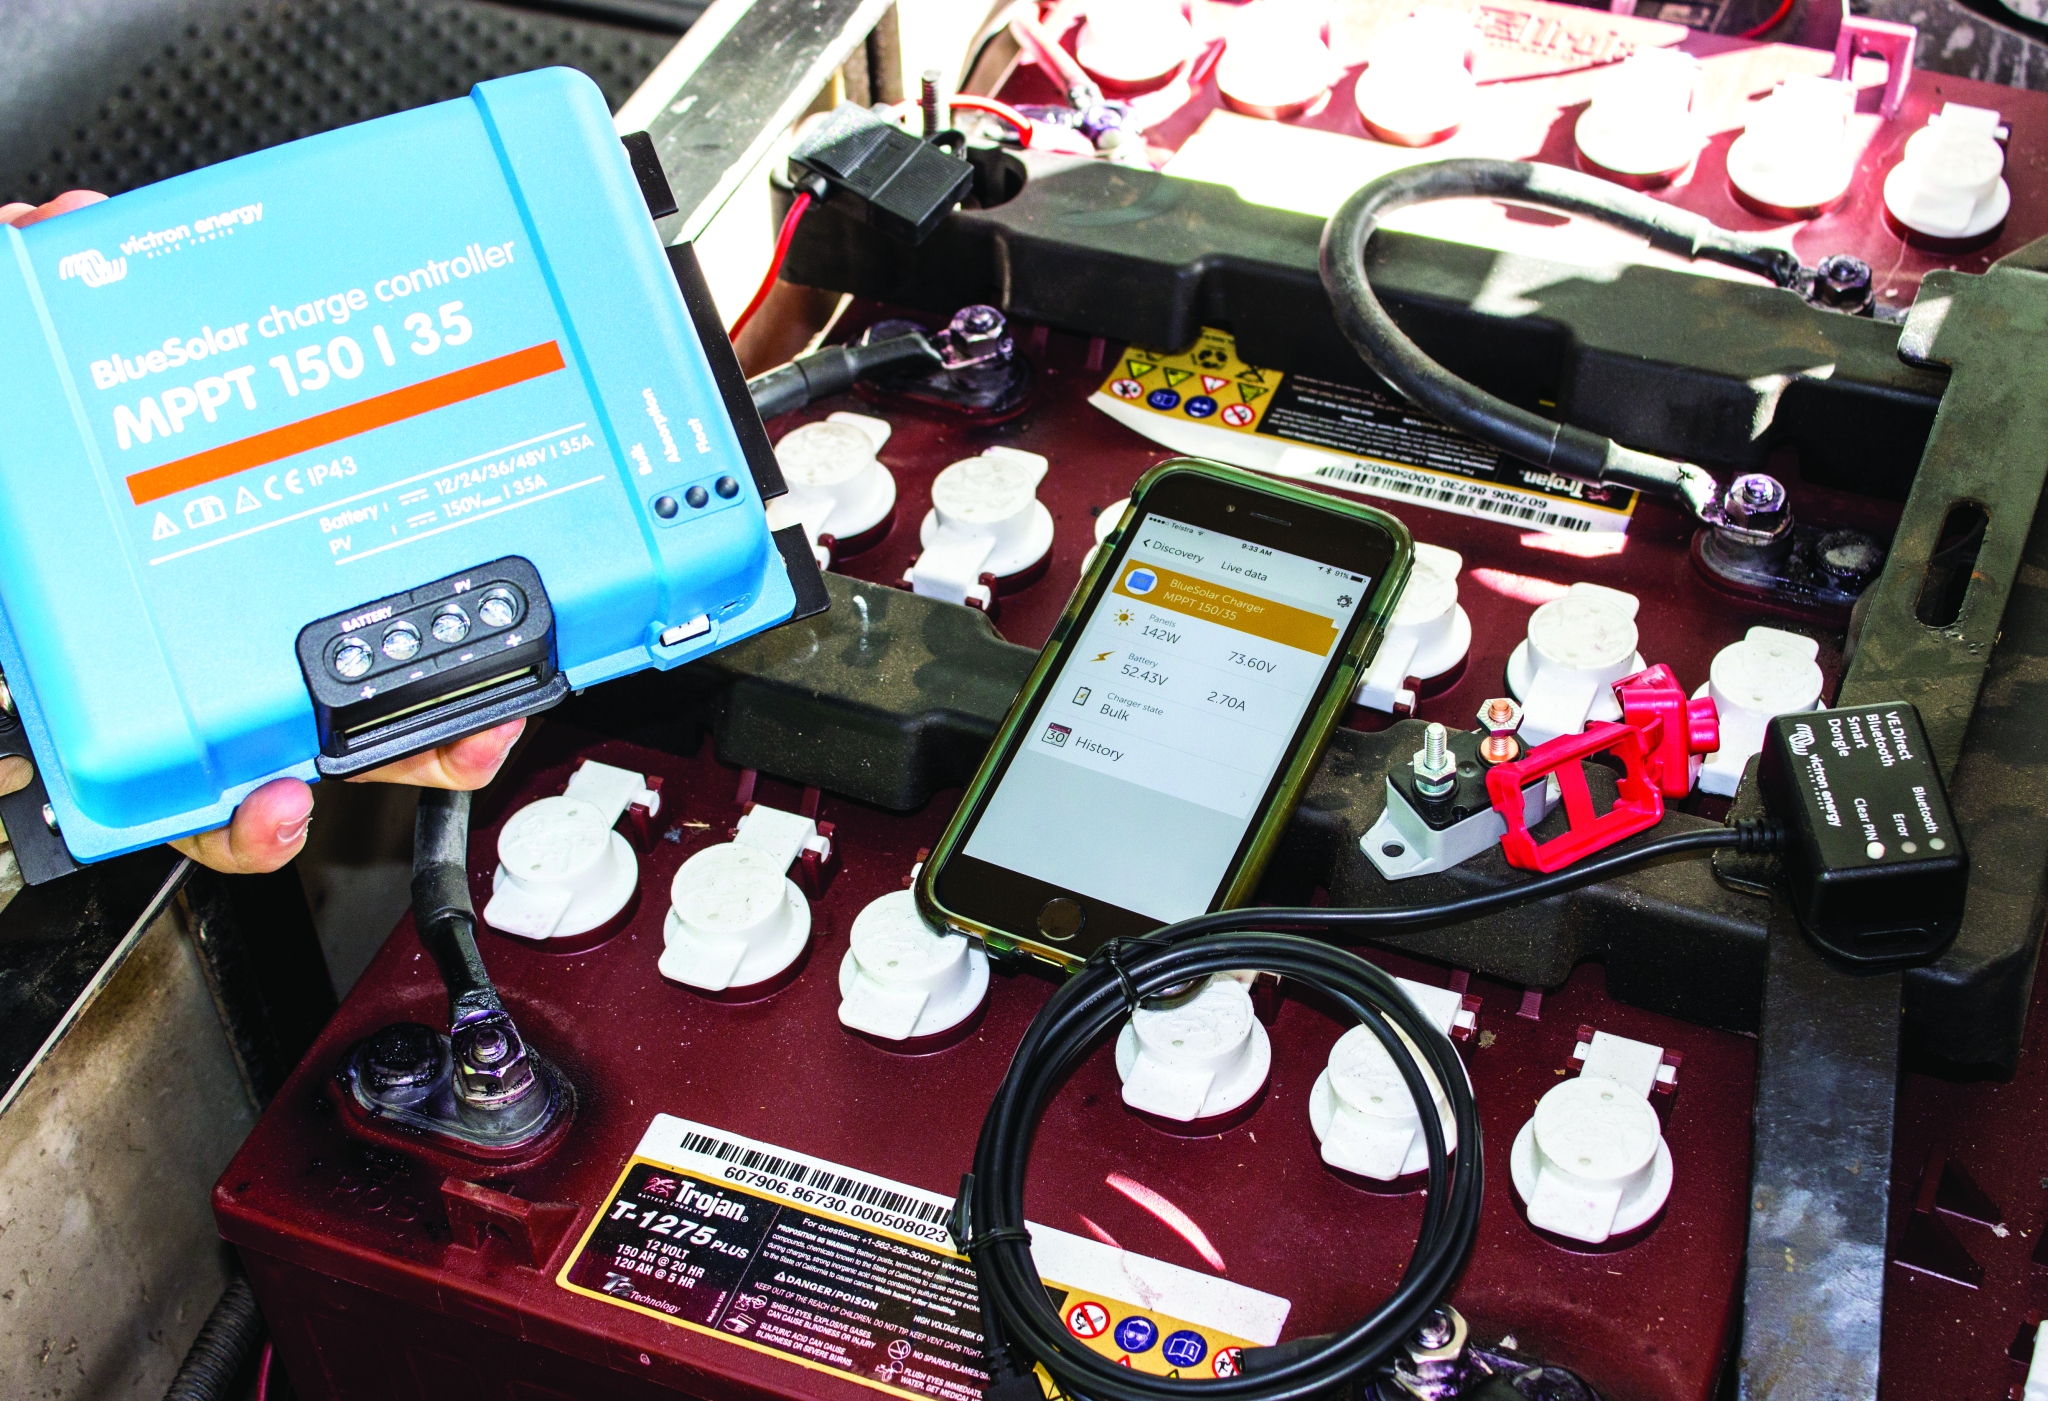
View the performance and efficiency of your KT 48V Electric Vehicle Solar Charging System with a simple touch of your smart-phone, through the connecting smart-phone application available for Android and iphone. The smart-phone application allows you to view the volts, amps and watts of your system in ‘realtime’, giving you a complete status of performance while you are on or off the course. The system will report data in all lighting conditions.

What is the purpose of the KT SOLAR 48V Electric Vehicle Charging System?
This system had been specially designed to maintain and extend battery life, and reduce D.O.D (Depth of Discharge) of your batteries. It also acts by reducing sulphur buildup and assisting the performance of your batteries.
This system has unique qualities & features that are not experienced in other systems. The main principle is to deliver a trickle charge to the battery bank in all lighting conditions, whilst the vehicle is in use or not.
The KT SOLAR 48V Electric Vehicle Charging System is also designed to operate on 36V applications, however is pre-set to charge 48V battery banks. For 36V battery banks, contact KT SOLAR for further instructions on setting up your controller.
In most cases, your batteries will not be in a discharged state, however with solar assistance, a constant charge will occur in a bulk or float mode. This is automatically controlled whilst in use or at idle with no load at all.
KT SOLAR have designed & manufactured a PV solar panel of 160 Watts, with a higher than expected voltage output. When coupled with the MPPT Solar Controller, maximum curve power points are locked in. The voltage is stepped down, leveled and regulated to deliver a charge at bulk and float amperages.
The solar panel dimensions are 1280mm x 800mm x 35mm. This panel is designed for use with the most common electric vehicle models, and fits perfectly onto the vehicle’s roof when used in conjunction with KT SOLAR ‘EZY’ Mounting Rails.
Deep cycle batteries, regardless of brand have a D.O.D rating (Depth of Discharge) The majority of manufacturers quote D.O.D percentage. This means that the batteries can be discharged down to at least 50% before requiring a recharge on mains (240V). Rarely a golf cart will reach this level during a round of golf, however it is mandatory the cart is recharged each evening regardless of the level of discharge.
An electric vehicle without solar assistance will hence be drawing down on battery power as it is being driven.
Solar assistance will be contributing a trickle charge whilst in use or not. Overnight mains charging frequency is now spread, depending on the ambient weather conditions.
The main feature & purpose of solar assistance is to reduce the D.O.D. (depth of discharge) of the batteries. This ensures an extended battery life, reducing the amount of damage from operating in an undercharged state. Essentially the solar charging system is a battery conditioner.
Mains (240V) charging is still required when necessary, however you will notice a reduction in frequency of mains (240V) charging.
The Bluetooth dongle will report complete system status in all conditions. In a short period, you will quickly get to know the characteristics of your ‘new’ vehicle performance.
As long as there is ambient sunshine your panel will harvest the solar energy and direct the correct charge to your batteries via the premium quality MPPT Solar Controller.
What kind of vehicle does the KT SOLAR 48V Electric Vehicle Charging System Suit?

Ideal for resort carts, service carts and golf buggies, the KT SOLAR Electric Vehicle Charging System runs using a premium quality MPPT Solar Controller, a wireless bluetooth dongle, 48V Monocrystalline Solar Panel, D.I.Y ‘EZY’ install mounting rails and a quality fitment kit containing all of the bits and pieces left to install your system.
This system is designed to suit the current roof of your vehicle and suits most models of carts.
Warranty
The KT SOLAR 48V Electric Vehicle Charging System offers a 3 year manufacture and build warranty on the panel, a 25 year warranty on efficiency and a 5 year warranty on the MPPT Solar Controller. On top of this, all KT SOLAR panels are uniquely barcoded for warranty registration and warranty recording.
When purchasing the kit, what is included?
When purchasing the KT SOLAR 48V Solar Charging System, you are purchasing the complete kit to fit an electric vehicle.
The fitment kit includes:
- 1 x Automatic Reset Circuit Breaker 30 Amp
- 1 x Red Circuit Breaker Cover
- 2 x Heavy Duty Connector 50 Amp, Red
- 1 x Heavy Duty Connector Handle/Removal Tool
- 2M x 5mm Twin Sheath Automotive Cable
- 2 x Insulated Ring Terminal, 6mm Yellow
- 2 x Insulated Ring Terminal, 8mm Yellow
- 3M x 10mm Corrugated Split Loom Tubing
- 2 x 20mm Nylon Cable Glands
- 25 x 200 x 4.7mm Black UV Treated Nylon Cable Ties
- 1 x EZY Mounting Rail, 1580mm Length (can be cut to suitable lengths)
- Solar Controller: Victron MPPT 150-35 Solar Controller
- 1 x Wireless Dongle (connects to iphone via bluetooth)
- Solar Panel: KT SOLAR 160W, 48V Solar Panel
How difficult is the KT SOLAR Charging System to install?
SAFETY: This DC Solar Panel generates in excess of 50 volts. Please follow all instructions in manual carefully.
The fitting of the solar panel to your roof should be done inside a covered workshop or shed environment, preferably out of ambient sunlight.
If fitting in outside environments, ensure to cover the Solar Panel with the cardboard carton packaging using masking tape to hold in place until full installation is completed. We recommend an auto electrician or qualified tradesperson fit this system.
MOUNTING THE SOLAR PANEL:

The KT SOLAR ‘EZY Mount’ Solar Panel Rail is 1580mm in length, and may be cut to size and positioned parallel to each other, on the sides that measure 1280mm long (the longer sides).
A good idea is to sit the rail ontop the roof to check if the roof may have a slight curve down at the front & rear. This will vary depending on the model of your cart. The rails can be cut as short as 700mm for a clean flat mount. If your cart has a curved roof, the ‘EZY’ mounting rails can be customised to suit your requirements.
KT SOLAR ‘EZY’ Mounting Rails feature a machined keyway in the vertical channel. This is to prevent your drill ‘wandering’ for a professional finish. Once the drill spacing holes have been evenly measured out for the stainless steel self-tapping screws (not supplied), drill your rail spacing holes slightly larger than the drill size into the actual panel (interference fit) We recommend 4mm into the rail and 3mm into the panel. Once the rails are evenly fixed to the panel, lower it onto the roof to confirm the fit.
Now centralise the panel, front and rear making sure it is dead centre and evenly spaced on top of the cart roof. With a fine pencil, mark lines all the way down each side, front and rear of the rail edges.
Fit the RED 50 Amp Heavy Duty Connector to the positive ( + ) and negative ( – ) leads from the panel. Cut these leads short enough to mount the 50 Amp Heavy Duty Connector to the underside corner of the solar panel. Drill and screw into place. Ensure to secure the Heavy Duty Connector Handle/Tool onto the connector at the cable run end.
Why? This is in the event your panel is damaged, vandalised or stolen, you can simply replace. The rails stay with the cart, the panel is removed by the side mounting screws and disconnecting the RED 50 Amp Heavy Duty Connector, via the Heavy Duty Connector Handle/Tool.
There are 3 options to secure the Solar Panel to the Roof of your electric vehicle.
A) Sikaflex White Silicon (for carts not exceeding highway speed of a caravan, however can travel on a trailer)
B) Screw mount down (for carts not travelling on a trailer at any time)
C) Both A + B (recommended for carts travelling on trailers at highway speed)
Any holes drilled into your roof should also be sealed.
The ridged underside of ‘EZY’ Mounting rails are designed to apply Sikaflex. Using a caulking gun, simply either apply a thick bead along your inside roof markings, or on the actual rail surfaces with the panel upside down on a tarp, etc.
Wait 3 minutes, then, with the assistance of a second person, quickly turn the panel over and lower slowly inside the pencil markings into it’s central position. Apply slight and even pressure, then place selected weights ontop of the panel, being careful not to scratch the surface. Leave overnight to cure. 24 hours is recommended. Never attempt to wipe away Sikaflex. Once cured, you can simply
trim off any excess from rail edges with slight pressure of a cutting tool.
MOUNTING THE MPPT SOLAR CONTROLLER:
The controller ideally should be mounted vertically with the four connection terminals facing downwards. This is normally mounted on under your electric vehicles seat, against the side wall using four stainless steel small pan head screw heads, washers & nyloc nuts. You may have to drill through the body.
WIRING:
It is most important to connect the MPPT Solar Controller to the battery terminals first, before the Solar Panel.
Run the supplied RED ( + ) cable from the positive ( + ) post on the battery to the supplied 30 Amp Automatic Reset Circuit Breaker, then to positive terminal on the MPPT Solar Controller’s battery connection bank. The circuit breaker is to be mounted on an insulated surface. Then connect the BLACK ( – ) cable from the negative ( – ) post on the battery to the other end of the battery bank. Then to the negative ( – ) terminal on the MPPT Solar Controller’s battery connection bank. Now the MPPT Solar Controller is powered.
Once you have assembled the RED 50 Amp Heavy Duty Connector and cable length to the Solar Panel, connect the RED ( + ) cable from the Solar Panel to the positive terminal of the MPPT Solar Controller’s Solar connection bank. Then connect the negative ( – ) BLACK cable of the solar panel to the MPPT Solar Controller’s negative Solar connection bank.
Note: The 5mm Twin Sheath cable from the solar panel may often be routed inside the box channel roof support for convenience and a tidy job. If this cannot be accomplished, simply protect your cabling with split loom and cable ties provided to the roof support at the rear corner.
20mm Nylon UV treated cable glands are supplied in the fitment kit if required to pass through two surfaces.


Is the KT SOLAR 48V Electric Vehicle Charging System difficult to maintain?
No, this system is very easy to maintain as it is fully automatic and will transfer to 240V Mains charging without any interference. There are no adjustments to be made what so ever. The solar panel can be cleaned periodically with a soft cloth and fresh water only. DO NOT use any form of household cleaners on your panel. The 160W 48V Solar Panel has a 25 year limited output efficiency warranty, with 3 years on build and manufacture. They are factory data logged for warranty via the barcode. See warranty details on the following page.
The Wireless Bluetooth dongle provides ‘live’ data readouts on your smart-phone. Simply connect into the white female dongle port on the MPPT Solar Controller and secure the dongle in your cart’s battery compartment. Follow the instructions in the MPPT Solar Controller Manual and download the application from your smart phone app store. Follow the prompts.
The smart-phone application data can be checked at any-time, giving you ‘real time’ readings in Amps, Volts and Watts.
Want to learn more about the KT SOLAR 48V Charging System or would like to find your nearest KT Solar Stockist? . . . Contact us below:
Error: Contact form not found.
